


"Can you move Spotify tracks to Ableton Live?" Not directly. Ableton Live is a popular digital audio workstation (DAW) used by many music producers. It allows users to create and manipulate sounds, record and edit audio, and mix and master tracks. Due to the perfect combination of audio sequencer and live control, it's a wonderful DJ app.
However, Spotify music files are encrypted in Ogg Vorbis, which doesn't allow users to move music to Ableton Live or other platforms directly. Don't worry, in this article, we will explore three ways to record Spotify into Ableton Live and create your own unique sound.


Part 1. How to Record Spotify into Ableton Live via Virtual Audio Routing
For users who are looking for a free method to record from Spotify to Ableton Live, Virtual Audio Routing is your best choice. This method involves creating a "virtual cable" inside your operating system that takes the output from your Spotify app and pipes it directly into an input channel in Ableton Live. This ensures you get the original audio quality from Spotify.
Record Spotify into Ableton Live via BlackHole on Mac
BlackHole is a free open-source tool that creates a virtual audio cable, thereby tricking your computer into believing that it is sending audio from one application to another.
Step 1. Download and install the BlackHole virtual audio driver from Existential Audio.
Step 2. Open your Mac's Audio MIDI Setup app, tap '+' and choose Create Multi-Output Device that contains both BlackHole and your key speakers or headphones.

Step 3. Go to your computer's System Settings, tap 'Sound' and choose this new Multi-Output Device as your primary sound output.

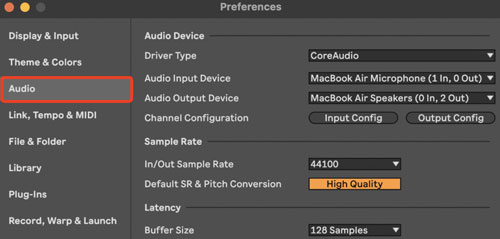
Step 4. Open the Preferences menu in Ableton Live program, go to the Audio option, and set your Audio Input Device to BlackHole.
Step 5. Create a new audio track, set its input channel to receive signals from BlackHole, and enable recording-arming for the track.
Step 6. Open the Spotify app on your Mac computer, find the track you like and click 'Play'.
Record Spotify into Ableton Live via Windows Audio Session API on Windows
For Windows users, you will enjoy a smoother experience, as modern PC audio drivers typically feature built-in loopback capabilities. If not, you can use Windows Audio Session API (WASAPI) or other third-party software to sample from Spotify to Ableton Live.
Step 1. Open the Windows Sound Control panel, go to the Recording tab and ensure your Stereo Mix or loopback device is enabled.

Step 2. Start your Ableton Live DAW Preferences and set the audio input device to match your active loopback channel.
Step 3. Enable a blank audio track, press the Record button, and play the track from Spotify.
Part 2. How to Import Spotify Songs to Ableton Live via AudFree Spotify Converter
Though the method above is free, it requires you to wait for the completion of the entire track, which wastes your time. If you want a more efficient way, you can try to put Spotify songs in Ableton Live.
However, as you probably know, Spotify songs are encoded in protected Ogg Vorbis. Moreover, the downloaded tracks are cached files and you can't find them locally, let alone drag Spotify songs to Ableton Live. Luckily, Ableton Live can support most of the common audio formats, like WAV, AIFF, FLAC, MP3, M4A, and more. In this case, you need to perform format conversion to download Spotify songs as local files that you can find on your computer.
Here, you can get support from the all-in-one AudFree Spotify Music Converter. It is well designed to download Spotify songs on your Windows or Mac locally. It helps you to convert Spotify songs to MP3, FLAC, WAV and M4A supported by Ableton Live.
| Spotify Music Format | DRM-protected |
|---|---|
| Ableton Live Supported Audio Formats | WAV, AIFF, FLAC, OGG, MP3, M4A |
| AudFree Output Format | MP3, WAV, AIFF, FLAC, M4A, M4B |
Moreover, it allows you to get the converted Spotify files in seconds as it runs 13 times faster. During the process, ID3 tags are saved 100% automatically and all downloaded Spotify tracks are lossless. In short, with this tool, you can easily import songs from Spotify to Ableton and mix or compose with Spotify music.
AudFree Spotify Music Converter

- Convert Spotify songs on your Windows or Mac locally
- Losslessly convert Spotify to MP3, WAV, FLAC, etc.
- Import tracks from Spotify to Ableton and other DJ software
- Work at 13X faster speed, preserve ID3 tags and parameters
How to Download Spotify Music to Ableton Live Supported Formats
The following are the detailed steps on how to convert Spotify songs to local plain files. After that, it couldn't be easier to import Spotify songs to Ableton Live, or other DJ software to mix and create the tunes you want.
- Step 1. Import Spotify Songs to AudFree Spotify Music Converter

- Install AudFree Spotify Music Converter and open it. Select the songs you plan to convert and add them to the conversion window of the tool.
- Step 2. Set the Output Preference for Ableton Live

- Choose the 'Menu' > 'Preferences' icon on the top-right of the interface. Tap the 'Conversion' bar, there are six formats for you - MP3, FLAC, AIFF, WAV, M4A, and M4B. Pick the one that meets your needs for Ableton Live. You can also personalize other parameters, like bit rate, sample rate, and the channel.
- Step 3. Convert Spotify Tracks for Ableton Live

- Hit the 'Convert' button, it will start to get Spotify songs into Ableton supported files. The conversion process only takes you a little time. When it's done, you can get the converted Spotify tracks in the history folder. Then you could use Ableton Spotify together and DJ in Ableton using Spotify songs.
To get songs into Ableton Live, you can use AudFree Streaming Audio Recorder. It supports downloading music from Spotify, Apple Music, YouTube Music, Amazon Music, Tidal, SoundCloud, etc. locally.
How to Import Songs from Spotify to Ableton Live
Now, local Spotify songs are ready. It's a great way to add unique Spotify sounds and textures to your Ableton productions. Just go through the steps to move Spotify tracks to Ableton Live as samples, so you can start incorporating your favorite tracks into your own music.
Method 1: Drag & Drop
Step 1. Open Ableton Live and create a new project.
Step 2. Open the folder where your local Spotify songs are stored.
Step 3. Select the song you want to import and drag it into the Ableton Live.
Step 4. The song will appear in the Arrangement View of your Ableton Live project.
Method 2: Using the File Browser
Step 1. In the Ableton Live interface, click on the "File" > "New Live Set" menu at the top left corner.

Step 2. Select the "Browser" > "Add Folder" on the sidebar to navigate to the folder where your Spotify songs are stored.

Step 3. Choose the folder that contains your target song and tap "Open".
Step 4. After that, you can start to make sample from Spotify Ableton Live.
Part 3. How to Get Spotify into Ableton Live via Audacity
If you don't want to route Spotify music internally via your DAW and pay for third-party tools, Audacity is an alternative to you. It is a free audio editor that can capture your system audio without complex routing. You can also trim the track and export it as WAV/MP3/FLAC for use.

Step 1. Open Audacity and go to the Audio Setup section at the top of the menu bar.
Step 2. Set Audio Host to Windows WASAPI (for PC) or virtual driver (for Mac).
Step 3. Change your Recording Device to your Primary output speakers with the loopback tag attached.
Step 4. Hit the Record button in Audacity, and play the track from Spotify.
Step 5. Choose the recorded track, go to File > Export to save Spotify music locally.
After that, you can add Spotify music to Ableton Live for use.
Part 4. Tips to Use Spotify Music on Ableton Live
Once the Spotify songs are imported into Ableton Live, you can start mixing them with other tracks to create your own unique sound. Here are some tips for DJing with Spotify music in Ableton and creating a professional-sounding track.

1. Preserving Audio Integrity (Bypassing Audo-Warp)
To keep a 1:1 bit-perfect playback of your track, you can do the following:
Step 1. Open your Ableton Live Preferences and go to the Record/Warp/Launch option.
Step 2. Locate the 'Auto-Warp Long Samples' toggle and turn it off.
Step 3. Drag your local Spotify music into an empty audio track in the Arrangement View. Then the file will play at its original speed.
2. Use 'Complex Pro' for High-Quality Sampling
If you want to sample Spotify in Ableton Live to rearrange or remix, you need the warp engine.
Step 1. Ensure your project Tempo is matched to the original BPM of the Spotify audio track.
Step 2. Double-click the audio clip to open the Sample Editor.
Step 3. Change the Warp Mode from the default 'Beats' to 'Complex Pro'.
3. Organize the File
Step 1. Create a folder on your primary drive to save the files for your project.
Step 2. In Ableton's Browser panel, scroll down to the 'Places' section and hit the 'Add Folder' button.
Step 3. Locate your newly created folder and hit 'Open' to lock this directory into your sidebar forever.
After that, you can save all your local Spotify music files into this folder and you create a library for easy access and management.
4. Master Your Gain Staging
Step 1. In the Arrangement View, choose the Spotify track you just imported.
Step 2. In the Clip View, locate the Gain slider.
Step 3. Now, lower the Clip Gain by -6dB to -10dB.
Part 5. The Verdict
Here are the three ways for you to record and add Spotify music to Ableton Live. You can choose the one that suits you.
Choose Virtual Routing if you want a free and hands-on method;
Choose AudFree Spotify Music Converter if you value time and want a library of high-quality music files;
Choose Audacity if you want suigical sampling and quick sound ripping.

Chief Editor

