


Canva has revolutionized the way we create visual content, making it incredibly easy to design everything from interactive business presentations to viral Instagram Reels. However, a stunning visual design can fall flat without the right background music. If your primary source of audio inspiration is YouTube Music, you have likely discovered that getting your favorite tracks into your Canva workspace is not a straightforward process.
Because Canva is primarily a cloud-based design tool, it has specific requirements for media uploads. In this comprehensive guide, we will explain exactly why you cannot directly link and add YouTube Music to Canva, how to safely extract those tracks as high-quality local files, and the essential copyright rules you must know before publishing your final design.


Part 1. Can You Add YouTube Music to Canva Directly?
The short answer is no. Although Canva provides a built-in audio library and allows users to upload their own audio files, it does not offer a direct import option for YouTube Music tracks.
The reason comes down to how both platforms handle audio files. Canva requires standard, accessible audio formats that can be uploaded and processed by its editing system, while YouTube Music downloads remain protected and locked inside the YouTube Music app.
Here is a quick comparison:
| Platform / Source | Audio Format | Compatibility |
|---|---|---|
| Canva Editor | MP3, M4A, OGG, WAV, WEBM | / |
| YouTube Music Offline Downloads | Encrypted offline cache files | ❌ Cannot Be Imported |
| AudFree Output Files | MP3, WAV, FLAC, M4A, AIFF, M4B | ✅ |
Beyond the standard audio formats, Canva also supports a wide range of video formats - including MP4, MOV, GIF, MPEG, MKV, and WEBM - as well as essential image file types like JPEG, PNG, and SVG.
YouTube Music uses encryption technology to protect offline downloads and ensure they can only be played within authorized YouTube Music applications. Because Canva cannot access or read these protected files, you cannot simply drag downloaded YouTube Music content into your Canva project.
To use YouTube Music as background music in Canva, you need to first convert the tracks into regular audio files such as MP3 or WAV that Canva can recognize.
Part 2. Method 1: Import Music from YouTube into Canva (Using Embed Features)
If you are creating an interactive presentation, online portfolio, or website design, you may not need to upload the audio file itself. Canva includes a built-in YouTube integration that allows you to embed public YouTube content directly into your project.
This method places a playable YouTube player inside your Canva design, allowing viewers to click and watch the embedded content.
Here is how to embed YouTube Music in Canva in just a few clicks:
Step 1. Go to the YouTube or YouTube Music, find the song, album, or playlist you want, and copy the sharing URL from your browser's address bar or via the "Share" button.
Step 2. Open your Canva project and click "Apps/Application" from the left-side panel.
Step 3. Type "YouTube" or "Embed" into the search bar under the Apps tab, then select the official YouTube Embed icon or the Embed tool.

Step 4. A search bar will appear within the sidebar. You can either search for the track name directly or paste your copied YouTube/YouTube Music URL right into the search box.
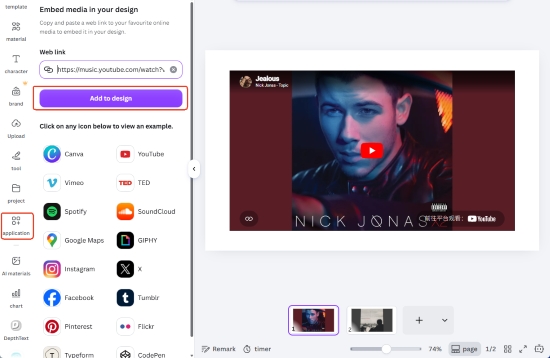
Step 5. Click on the video/audio item that pops up in the results. It will instantly drop onto your canvas. You can now resize it, drag it into place, or frame it to match your design.
The Major Limitation (Why You Might Need Method 2):
Embedding via the YouTube app only places a visible video box on your canvas. The music will only play if the viewer actively clicks the "Play" button on the widget while viewing your project as a live website or presentation link. That is to say, the YouTube player remains an external element rather than part of your exported video.
If you are exporting your Canva project as an MP4 video (like an Instagram Reel, TikTok, or promo video) or presentation file, the embedded widget will be completely muted and frozen.
For continuous background music (BGM) that plays automatically and seamlessly in exported videos, you must upload the music as a local audio file. Keep reading to learn how to do exactly that.
Part 3. Method 2: Prepare YouTube Music as Local Audio Files for Canva (Using AudFree)
For creators who want YouTube Music to work as background music in Canva videos, the most reliable approach is to prepare the tracks as standard audio files first.
AudFree YouTube Music Converter provides a convenient way to capture music playback and save tracks in Canva-compatible formats such as MP3, WAV, and M4A. Unlike basic, ad-heavy online recorders that severely compress audio quality, AudFree is a professional-grade desktop tool. It also helps preserve important metadata, including song titles, artists, and album information, making your music library easier to organize.
Using software like AudFree to capture YouTube Music is strictly intended for personal, educational, and offline use.
AudFree YouTube Music Converter

- Convert YouTube Music to MP3, WAV, M4A, and more
- Convert Soundcloud's entire albums or playlists up to 30X speed
- Offer multiple streaming services support (over 10)
- Automatically recognize and retain ID3 tags
- Ad-free output with original audio quality
- Fully compatible with Windows & Mac
- Step 1. Set Output Format of YouTube Music for Canva
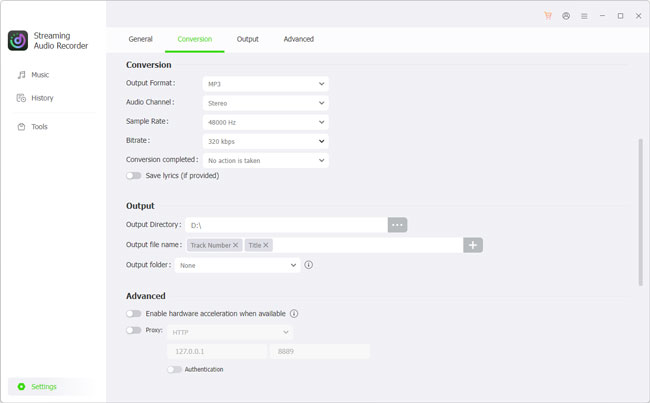
- Launch the AudFree program on e on your Windows or Mac computer. Click the Settings, then choose MP3 as the output format. You can also customize bitrate, sample rate, and audio channels. Under the Output tab, select your preferred destination folder and enable ID3 tag retention.
For the best results, manually set the bit rate to 320kbps and the sample rate to 48000Hz. This prevents your audio from sounding "tinny" or distorted once Canva compresses your final exported video.
- Step 2. Add YouTube Music Tracks for Conversion
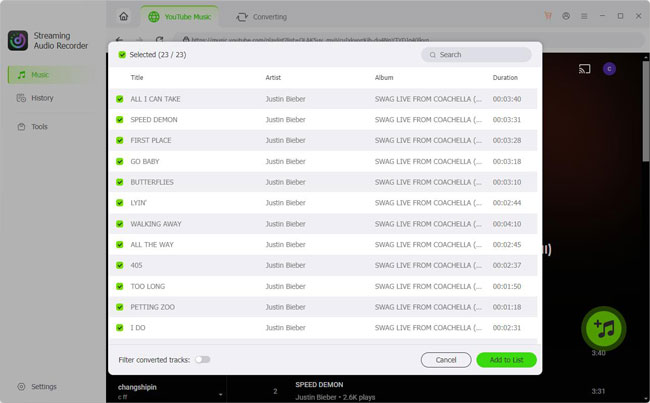
- Click the YouTube Music icon on the main interface, sign in to your account, and browse for songs, playlists, or albums in the built-in web player. Click the green '+' button to add them to the conversion list. There is no limit on the number of songs you can add at once.
- Step 3. Start Downloading YouTube Music for Canva
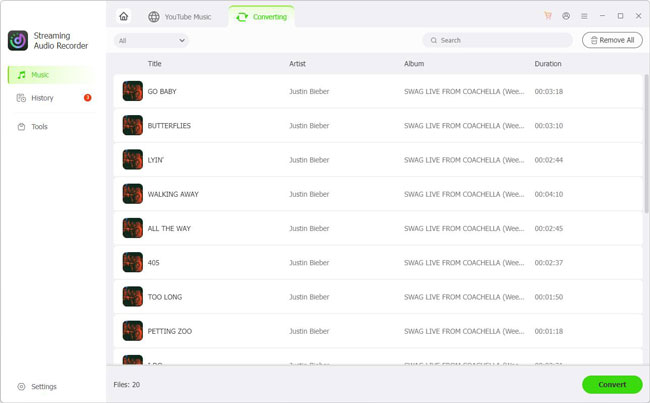
- Go to the Converting tab on the top and click Convert. The tool will start downloading and converting YouTube Music in bulk. Once finished, all converted YouTube Music audio files will appear in your selected output folder and can be accessed under the History section.
See also: Best YouTube Music Downloaders
The converted audio can then be uploaded directly to Canva and used as background music in your designs.
Part 4. How to Upload YouTube Music to Canva (Web/Desktop)
Since Canva is built around a cloud-based editing workflow, uploading your converted MP3 files through the desktop browser is usually the easiest way to add YouTube Music to your designs.
Please follow these steps to add YouTube Music to Canva on your computer:
Step 1. Open your browser and sign in to your Canva account. Then open an existing project or create a new design, such as a video, presentation, or social media post.

Step 2. From the left-side editor menu, click Uploads and choose Upload files.

Step 3. Browse your computer folder and select the converted YouTube Music MP3 or other Canva-compatible file. You can also drag and drop the audio file directly into the Canva editor window.
Step 4. Once the upload is complete, click the uploaded audio file to add it to your project. For video designs, the track will appear on the timeline, where you can trim, adjust volume, and synchronize it with your visuals.

After importing, your YouTube Music track is ready to use as background music in Canva.
Part 5. How to Add YouTube Music to Canva App (iOS/Android)
Creating designs directly from your phone is one of Canva's biggest advantages. However, adding custom audio files on mobile can be slightly less straightforward because the files need to be accessible from your device storage first.
The easiest workflow is to transfer your converted YouTube Music files to your phone and then import them through Canva's upload feature.
Step 1. Upload your converted MP3, M4A, or WAV files to a cloud storage service such as Google Drive or Dropbox, or transfer them directly to your phone using a USB connection or AirDrop (for iPhone).
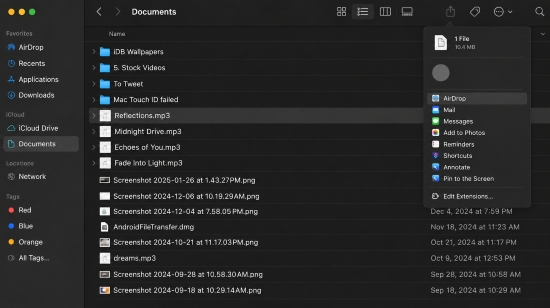
Step 2. Launch the Canva mobile app and open the video or presentation project where you want to add background music.
Step 3. Tap the '+' (Add) button at the bottom of the screen, then look for Uploads or Files (the exact name may vary depending on your app version).

Step 4. Choose Upload files and browse your phone storage or connected cloud folders. Select the converted YouTube Music track and wait for the upload to finish.
Step 5. Tap the uploaded audio file to insert it into your project. If you are editing a video, you can adjust the timing, trim sections, and control the volume directly inside Canva.
With this workflow, you can keep a collection of ready-to-use YouTube Music tracks on your phone and quickly add custom background music whenever you create new Canva content.
Part 6. Pro Tips: Editing & Syncing YouTube Music in Canva (After Downloading)
Bringing your local YouTube Music downloads into Canva gives you total creative control over your project's pacing. For a flawless multimedia experience, apply these quick timeline hacks:

1. Use Audio Effects for Clean Cuts: Don't let your music start or stop abruptly. Tap your audio timeline bar and use the Fade In/Out sliders to create a polished, cinematic transition.
2. Adjust Volume: Hit on the audio track to bring up the audio settings on the top line. You can click the "Volume" icon to increase/decrease the audio level.
3. Align with the Expanded Waveform: Double-clicking the audio bar unfolds the music track's waveform. Use this visual guide to manually anchor your most dramatic slide changes directly onto the track's major crescendos. Also, you can drag the slider left or right to select the exact 15- or 30-second segment that best fits your design's pacing, clipping out unwanted filler.
4. Leverage Automated Syncing: If manual alignment feels too tedious, let Canva do the heavy lifting. Use the Audio Sync tool to automatically align your pages and video element animations with the exact tempo of your background track for a fluid, professional flow.
5. Split Audio: If your video has multiple scenes, you can split the audio track and place segments in different parts of the video as needed.
Part 7. Troubleshooting: YouTube Music Not Uploading or Playing in Canva
When working with third-party audio files and cloud-based editing tools, you may occasionally encounter problems while uploading or playing YouTube Music tracks in Canva. Most issues can be solved with a few simple checks.
1. Upload Failed: File Format Not Supported
If Canva rejects your audio file, verify that it is not saved in a proprietary format. Make sure the audio has been exported as a standard format, such as MP3, WAV, or M4A.
If the file was created with AudFree, confirm that the conversion process completed successfully. It is also a good idea to play the audio file on your computer before uploading to make sure it is not damaged or incomplete.
2. File Size Exceeds Limits
Large audio files may fail to upload because Canva has limitations on uploaded media file sizes (a maximum of 250MB). For example, a long YouTube Music compilation saved as an uncompressed WAV file can quickly become very large.
To reduce the file size while maintaining good audio quality, consider exporting your track as an MP3 file at 320kbps. This format offers a practical balance between sound quality and storage space, especially for video projects and presentations.
3. Audio is Glitching or Stuttering in the Editor
Because Canva works as a cloud-based editor, playback problems are often related to browser performance or internet connection rather than the audio file itself.
Try the following fixes:
- Pause playback and allow the project to finish loading
- Check your internet connection
- Close unnecessary browser tabs
- Clear your browser cache or restart Canva
In many cases, the exported video will play smoothly once rendering is complete, even if the preview occasionally stutters.
4. Copyright and Publishing Issues
Importing YouTube Music into Canva solves the technical compatibility problem, but it does not remove copyright restrictions.
If you export a Canva video containing copyrighted YouTube Music tracks and upload it publicly to platforms such as YouTube, TikTok, or Instagram, the platform will detect it instantly. This can result in your video being muted, blocked in certain countries, or your account receiving a copyright strike.
For commercial videos, advertisements, branded content, or monetized channels, it is recommended to use Canva's built-in royalty-free music library or properly licensed tracks that allow commercial use.
Part 8. FAQs About Adding YouTube Music to Canva
Can I add YouTube Music to Canva for free?
Yes, you can add YouTube Music-related content to Canva for free through the YouTube embed feature. However, if you want to use a YouTube Music track as background audio in an exported Canva video, you need to first prepare it as a compatible local audio file.
Does Canva reduce audio quality after YouTube Music upload?
Canva may process and compress media during editing or export. To maintain better quality, upload a high-quality audio file such as MP3 or WAV and avoid repeatedly converting the file between different formats.
Conclusion
Adding the right soundtrack can significantly improve a Canva project, whether you are creating a social media video, presentation, or promotional design.
Although Canva and YouTube Music do not offer direct integration, you can still use your favorite tracks by either embedding public YouTube content for interactive designs or preparing compatible audio files for video projects.
With a tool like AudFree YouTube Music Converter, you can save YouTube Music playback as common audio formats supported by Canva, organize your music library, and enjoy a smoother editing workflow. Just remember to utilize Canva's powerful audio fading and beat-syncing tools, and always adhere to copyright best practices when publishing your final masterpiece.

Staff Editor


