


Apple Music gives you access to millions of songs, albums, and playlists, but there are times when streaming alone isn't enough. Whether you want to play Apple Music in a car without CarPlay, listen through a smart TV, use a DJ controller, or keep an offline music collection on a USB drive, transferring Apple Music to USB can provide much greater flexibility and device compatibility.
However, Apple Music tracks can't simply be copied to a USB flash drive like regular audio files. Downloaded songs are protected and designed to work within the Apple Music ecosystem, which is why dragging them directly to a USB drive often results in unplayable files. In this guide, we'll explain what is and isn't possible, show the official way to transfer purchased iTunes songs, and demonstrate how to download and transfer Apple Music to a USB drive for playback on virtually any device.


Part 1. Can You Transfer Apple Music to a USB Drive?
The short answer is yes, but it completely depends on the type of music in your library.
Apple Music users typically have two kinds of audio files:
- Purchased iTunes songs
- Apple Music subscription downloads
Understanding the difference between them is the key to determining whether you can transfer Apple Music to a USB drive and play it on other devices.
Apple Music Downloads vs Purchased Songs: What's the Difference?
Although both appear in your music library, they are stored and managed differently.
- Purchased iTunes Songs (.m4a): These are tracks you bought individually from the iTunes Store or ripped from physical CDs. They are completely DRM-free (Digital Rights Management free). You own these files outright and can freely copy them to a USB drive, external hard drive, MP3 player, car stereo, or other compatible devices (virtually any machine).
- Apple Music Downloads (.m4p): These are files downloaded through an active Apple Music subscription for offline listening. They are protected by Apple's FairPlay DRM technology and are tied to your Apple ID and subscription status. While the files are stored on your device, they can only be played through authorized Apple Music apps and devices. As a result, they cannot be directly transferred to a USB drive for playback on most cars, TVs, media players, or home audio systems.
| Music Type | Transfer to USB Directly? | Play Without Subscription? |
|---|---|---|
| Purchased iTunes Songs | ✅ | ✅ |
| Apple Music Downloads | ❌ | ❌ |
Where Are Apple Music Downloads Stored?
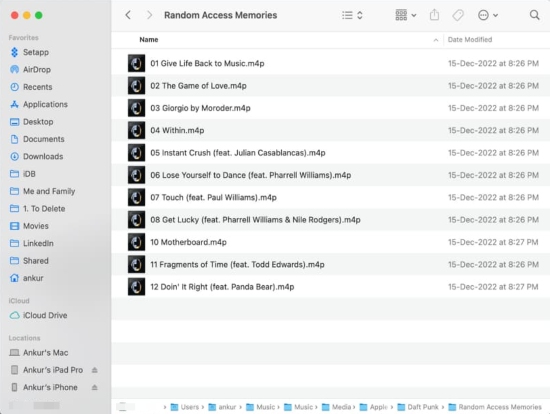
If you have downloaded tracks onto your computer and want to inspect them, you can find them in your local music folders.
By default, the operating systems organize downloaded local files into these specific directories:
- On macOS: /Users/[YourUsername]/Music/Music/Media/Apple Music/
- On Windows: C:/Users/[YourUsername]/Music/iTunes/iTunes Media/

See also: Where Is Downloaded Apple Music Store
Inside these folders, you'll see music organized by artist and album. If a track is DRM-free (such as a purchased song), it can usually be copied directly to a USB drive. However, Apple Music subscription downloads remain protected, so additional steps are required before they can be played on non-Apple devices.
Instead of spending a massive budget on individual songs from the iTunes Store, Part 3 introduces a far more cost-effective alternative to secure permanent, DRM-free audio with maximum efficiency for USB storage.
See also: How to Buy the Apple Music Songs from iTunes Store
Part 2. How to Transfer Purchased iTunes Songs to USB (Official Way)
If your library consists of songs you've purchased from the iTunes Store or imported from CDs, transferring them to a USB drive is simple. Because these files are DRM-free, Apple places no restrictions on copying or moving them between devices.
Follow these steps to transfer purchased Apple Music songs to a USB flash drive:
Step 1. Insert your USB flash drive into an open port on your Mac or Windows PC.
Step 2. Launch the Apple Music app on your Mac or iTunes on Windows computer.
Step 3. Go to Library and locate the purchased songs you want to transfer.
Step 4. Right-click the song and select Show in Finder (Mac) or Show in Windows Explorer (Windows). This will open the folder where the audio files are stored locally.
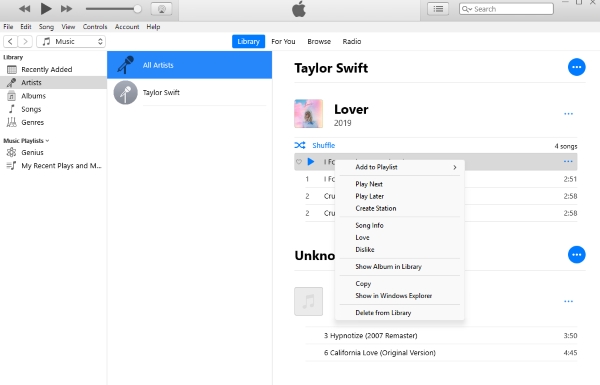
Step 5. Select the songs you want to copy. To transfer multiple tracks, you can open the corresponding album or artist folder and use Cmd + A (Mac) or Ctrl + A (Windows) to select all files.
Step 6. Drag and drop the selected songs to your USB drive, or use the Copy and Paste commands to transfer them.
Step 7. Once the transfer is complete, safely eject the USB drive.
Alternatively, you can navigate directly to the storage directories mentioned in Part 1, select the folders manually, and copy them to the flash drive.

Please note that this method only works for purchased iTunes tracks and files that are already DRM-free. Standard Apple Music streaming downloads are encrypted and cannot be copied directly to a flash drive. To transfer your streaming subscription catalog, skip ahead to the next section.
Part 3. How to Convert Apple Music to USB on Windows & Mac (Universal Way)
As established, downloaded Apple Music subscription tracks (.m4p) are essentially "rented" on your local drive. Because your subscription requires continuous cloud verification, standard drag-and-drop methods fail immediately. To make these files playable on offline hardware like older car stereos or televisions, you need a dedicated third-party Apple Music converter to strip the FairPlay encryption layer and transcode the files into open-source formats like MP3, FLAC, or WAV.
AudFree Apple Music Converter is a highly reliable option for this task. It is specifically built to bypass Apple Music's formatting restrictions via batch conversion while preserving crucial ID3 tags (track titles, album art, artists, and track numbers). It even offers a 24-bit/192kHz high-resolution export tier for audiophiles who want to maintain maximum audio fidelity. With it, you will freely copy Apple Music to USB stick without any restrictions.
By using this tool to save your playlists locally, you can keep your music collection permanently on your USB drive - even if you decide to cancel your Apple Music subscription down the road.
AudFree Apple Music to USB Converter

- Convert Apple Music to MP3, WAV, FLAC, AIFF, M4A, etc.
- Preserve original audio quality and ID3 tags
- Support batch conversion at up to 17× faster speed
- Losslessly Remove DRM from Apple Music
- Customize output bitrate, sample rate, and audio channels
Section 1. Convert and Download Apple Music to USB-compatible Formats
Before you begin, ensure you have an active Apple Music subscription, a computer (Mac or Windows), the AudFree software installed, a USB drive formatted to FAT32 or exFAT, and AudFree Apple Music Converter installed.
- Step 1. Load Apple Music Songs to AudFree Apple Music Converter

- Launch AudFree Apple Music Converter and sign in to your Apple Music account through the built-in web player. Browse your library and add the songs, albums, or playlists you'd like to transfer to a USB drive. Then click the '+' button to load them to the convertion list of AudFree.
- Step 2. Set Apple Music Output Format for USB Drive

- Move your mouse to the top-right corner and click the 'menu' icon > 'Preferences'. Then you'll be led to the new window. Here, you can define the output format. For example, you can convert Apple Music songs to FLAC, MP3, M4A, AIFF, WAV, Lossless, or M4B. For universal compatibility with most USB drives, MP3 is most recommended.
- Also, further advanced output parameters such as bitrate, sample rate, and audio channel can be customized as needed. For the metadata preserved, you can go to the Output tab. And the output route can also be customized as you like.
- Step 3. Download Apple Music for USB drive

- Click the 'Convert' button to start the conversion process. AudFree will save your selected Apple Music tracks as unprotected local audio files while keeping the original metadata intact at up to 17x speed. Once the conversion is complete, click the 'Converted' icon to access the output folder.
If you want to expand your local library beyond Apple Music, consider utilizing AudFree Streaming Audio Recorder. This versatile companion tool features direct compatibility with over 10 major music streaming platforms - including Spotify, Tidal, and YouTube Music - allowing you to seamlessly capture, convert, and archive any track directly to your USB drive.
Section 2. How to Put Apple Music on USB Drive
With AudFree Apple Music Converter, now you get the local Apple Music songs on your computer for use. In this case, you can transfer Apple Music to USB flash drive for playing anywhere. Just check the steps below to make it.
Step 1. Please connect your USB stick to the computer via the USB port.

Step 2. Inside the AudFree interface, click the 'Converted history' icon (represented by a magnifying glass/search button) > 'Folder' to jump directly to the local folder containing your newly decoded music files.

Step 3. Now, open the USB drive on your computer. Then you can copy and paste the converted Apple Music files to your USB drive's folder. You can also drag and drop files to USB drive directly.

Step 4.Once the transfer progress bar finishes, safely eject the USB drive from your desktop operating system. It is now fully prepared for unrestricted playback in your vehicle, smart TV, or standalone media player.
Alternatively, if you've specified a custom output folder in the Conversion section, you can simply locate the converted Apple Music files there and copy them directly to your USB drive.
AudFree Apple Music Converter vs Standard iTunes Transfer
| Feature | AudFree Apple Music Converter | Direct iTunes Transfer |
|---|---|---|
| Works with Apple Music Subscription Songs | ✅ | ❌ |
| Transfer Music to USB Drive | ✅ | Limited to Purchased Songs |
| Output Formats | MP3, FLAC, WAV, AIFF, M4A, M4B, Lossless | AAC (.m4a) Only |
| Play on Cars, TVs, and Media Players | ✅ | Purchased Songs Only |
| Customize Audio Settings | ✅ | ❌ |
| Preserve ID3 Tags and Artwork | ✅ | ✅ |
If your library contains only purchased iTunes songs, you can use the official method in Part 2. AudFree is primarily designed for Apple Music subscription downloads that cannot be transferred directly to a USB drive.
Part 4. Real Test: Playing Apple Music from USB in Cars, TVs and Music Players
After converting and transferring Apple Music to your USB drive, the final step is ensuring your playback hardware is configured to recognize it. While most modern devices are versatile, they interpret file systems and metadata differently.
To see how well converted Apple Music files perform across different environments, we ran a series of real-world benchmark tests using a standard 128GB USB 3.0 flash drive loaded with three popular formats: MP3 (320kbps), FLAC, and WAV.
Performance & Compatibility Results
| Device | MP3 | FLAC | WAV |
|---|---|---|---|
| Car Stereo | ✅ | Depends on Model | Depends on Model |
| Smart TV | ✅ | Limited Support | Limited Support |
| Sony Walkman | ✅ | ✅ | ✅ |
| FiiO Music Player | ✅ | ✅ | ✅ |
| Home AV Receiver | ✅ | ✅ | ✅ |
| Gaming Console (PS5/Xbox) | ✅ | Limited App Support | Depends on Console |
Key Takeaways from Our Tests:
Based on our testing, here is what you need to know for a seamless listening experience:
• For Cars: MP3 remains the "gold standard". It is universally supported by almost every car head unit. However, if you try to play lossless FLAC or WAV files, success depends heavily on your vehicle's manufacturing year and infotainment firmware. Older decks will simply skip FLAC or WAV files entirely.
See also: How to Play Apple Music in Car
• For Smart TVs: While TVs easily handle MP3 streams via their native media player apps, high-resolution WAV and FLAC support is highly fragmented across brands like Samsung (Tizen), LG (webOS), and Sony (Android TV).
• For Dedicated Digital Audio Players (DAPs): Audiophile hardware from brands like Sony and FiiO natively handles everything you throw at it. These devices are built with specialized DACs (Digital-to-Analog Converters) meant to process heavy, uncompressed FLAC and WAV bitstreams without breaking a sweat.
• For Home Audio Hubs: Modern AV receivers offer exceptional USB playback architecture. Most mid-to-high-end receivers effortlessly decode high-resolution audio files straight from a front-panel USB port.
Troubleshooting "No Media Found" and Connection Errors
Even if your file formats match our compatibility chart perfectly, plugging a thumb drive into a vehicle or media center can sometimes trigger an frustrating "No Media Found", "Unreadable Device", or "USB Error" message.
If your device fails to recognize your Apple Music files, the problem is usually caused by one of two common compatibility issues.
1. Incorrect File System Formatting
Unlike computers, most standalone media systems (e.g., car head unit) do not use complex operating systems. They cannot read proprietary, platform-specific drive formats like Windows NTFS or Mac-native APFS/HFS+. If your flash drive is formatted with the wrong file system, the host device will treat the entire drive as blank or broken.
To fix this, you must wipe and reformat the drive using a globally accepted standard:
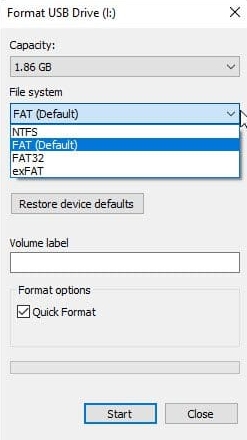
- FAT32: The absolute safest option for older vehicles, basic stereos, and older legacy hardware. Its primary downside is that it cannot handle individual files larger than 4GB - though this rarely poses an issue for individual music tracks.
- exFAT: The ideal layout for modern infotainment systems, gaming consoles, and large-capacity flash drives (64GB to 512GB). It easily handles massive, high-resolution FLAC or WAV albums without the structural partition limitations of FAT32.
2. Hidden macOS Metadata Index Files (._ files)
If you configure and copy your music library using a Mac, macOS automatically generates tiny, hidden metadata index files (known as resource forks) right alongside your actual songs. These hidden files mirror your tracks but are prefixed with a dot and an underscore - for example, ._01-Starboy.mp3.
While macOS automatically keeps these files invisible to your eyes, basic USB media players in cars and TVs cannot filter them out. The system sees them as legitimate audio tracks, tries to play them, fails, and subsequently throws an error or skips through your playlist erratically.
The fix this, you need to purge these "phantom" files before ejecting your USB drive from your Mac:
Open the native Terminal app on your Mac, type 'dot_clean' (make sure to leave a space after the command), and then drag your USB drive's desktop icon directly into the Terminal window to auto-populate its specific directory path. Press 'Enter', and the system will instantly scrub the drive clean of hidden clutter, leaving a pristine folder structure that any car or media player can easily read.
Part 5. FAQs About Apple Music to USB
Can I play Apple Music directly from a USB drive on an Apple HomePod?
No. HomePods lack physical USB input ports. They rely entirely on wireless AirPlay streams or direct cloud connections via your Apple ID ecosystem.
What happens to converted USB music if I cancel my Apple Music subscription?
If you used standard official channels, subscription tracks are protected and cannot be transferred at all. If you used a third-party conversion recording tool to output DRM-free copies (MP3/FLAC) onto a USB drive, those files remain permanently functional on your drive even if your official subscription tier lapses.
Is it legal to convert Apple Music tracks to a USB drive?
Stripping encryption mechanisms for distribution or commercial monetization violates copyright laws and Apple's Terms of Service. However, creating a personal, private offline backup copy of media you currently have legal access to generally falls under fair-use provisions in various regions, provided the files are never shared with others.
Can I transfer Apple Music Lossless audio (24-bit/192kHz high-resolution) to USB flash drive?
Yes, but only if you choose a lossless output format such as FLAC or ALAC during the conversion process. Apple Music offers Lossless and Hi-Res Lossless audio quality up to 24-bit/192kHz. To preserve as much of the original audio quality as possible, use a converter that supports high-quality, lossless output, such as AudFree Apple Music Converter.
Can I copy iTunes Music to USB in MP3 format?
Yes, you can do that via the iTunes program. Please follow the guide below to make it.
Step 1. Start iTunes and hit 'Edit' > 'Preferences'. Then tap 'General'.
Step 2. Click on 'Import settings' > 'Import Using' > 'MP3 Encoder'. Next, hit 'OK'.

Step 3. Back to your iTunes library and pick up the music files you want to convert in MP3 format.
Step 4. Once selected, click 'File' > 'Convert' > 'Create MP3 Version' to convert iTunes music to MP3.

Step 5. Now, connect a USB stick to your computer and launch iTunes. Then find and export the converted MP3 iTunes music files to your USB drive.
Conclusion
Exporting Apple Music to a physical USB drive requires navigating the boundaries of modern media ecosystems. While DRM restrictions can initially stall your plans, distinguishing between your owned files and subscription media gives you a clear path forward.
By leveraging conversion workarounds for protected songs (via AudFree), using universal file formatting like FAT32, and ensuring your metadata tags and relative playlist paths are clean, you can easily bypass ecosystem limitations. Taking these extra steps guarantees a reliable, completely portable offline audio collection that is ready to play smoothly on any device you plug it into.

Staff Editor


